Checkouts
Open Services → Checkouts and select a shop. Its details contain payment settings, contact details, shop connections, bank accounts, allowed payment methods and test logs.

Selecting a shop in Checkouts
Detail
Go to Services → Checkouts → select a shop → open the Detail tab.
The Detail tab shows:
the configured price list
shop status
merchant MID
allowed countries
Allowed countries determine which countries the gateway accepts card payments from. To add more countries, contact customer support.
Under Payment settings, you can change:
payment expiration and enable or disable dynamic expiration
You will also find settings for the refund email.
You can also configure 3D Secure authentication.

Payment settings in the gateway details
Under Contact details, click Edit. You can configure:
the language of statements and merchant emails (Czech, Slovak or English)
the hotline phone number and email
the contact email
emails for notifications, e-shop connection errors, statements and billing.
The Payment request e-mail is displayed here for reference only. To change it, contact customer support.
We also provide payment transaction information through the API.

Gateway contact details and languages
Shop connection
Go to Services → Checkouts → select a shop → open the Shop connection tab.
On the Shop connection tab, select a specific connection.

Selecting a shop connection
Its details include:
Merchant ID
Secret (password)
the payment creation method
allowed IP addresses
return URLs and customer email notification settings.
Use Edit to make changes.

E-shop connection details and editing
New shop connection
To create a new connection, use Add connection on the Shop connection tab.
If you use one of the supported e-commerce platforms, also follow the instructions for that platform.
The connection's Merchant ID and the MID on the Detail tab are different identifiers. Use the details of the specific shop connection to integrate your shop.
Adding a new shop connection
Bank connection
Go to Services → Checkouts → select a shop → open the Bank connection tab.
Here you will find the configured payout accounts, their currencies, identifiers and the default account flag. The overview also includes the fictitious ABO account and SWIFT.

Payment gateway bank accounts
Click an account to display its details and the payouts sent to it.

Bank account details and recent payouts
Allowed payment methods
Go to Services → Checkouts → select a shop → open the Allowed payment methods tab.
Use this tab to check the payment methods enabled for the shop, their currencies and statuses. To add more methods or re-enable a method, contact customer support.

Allowed payment methods for a shop
Shoptet settings
If your shop is connected to Shoptet, its details also include a Shoptet tab.
Go to Services → Checkouts → select a shop → open the Shoptet tab.
Use Edit to set, for example, the order status after payment and after cancellation. Additional options depend on the connection type.
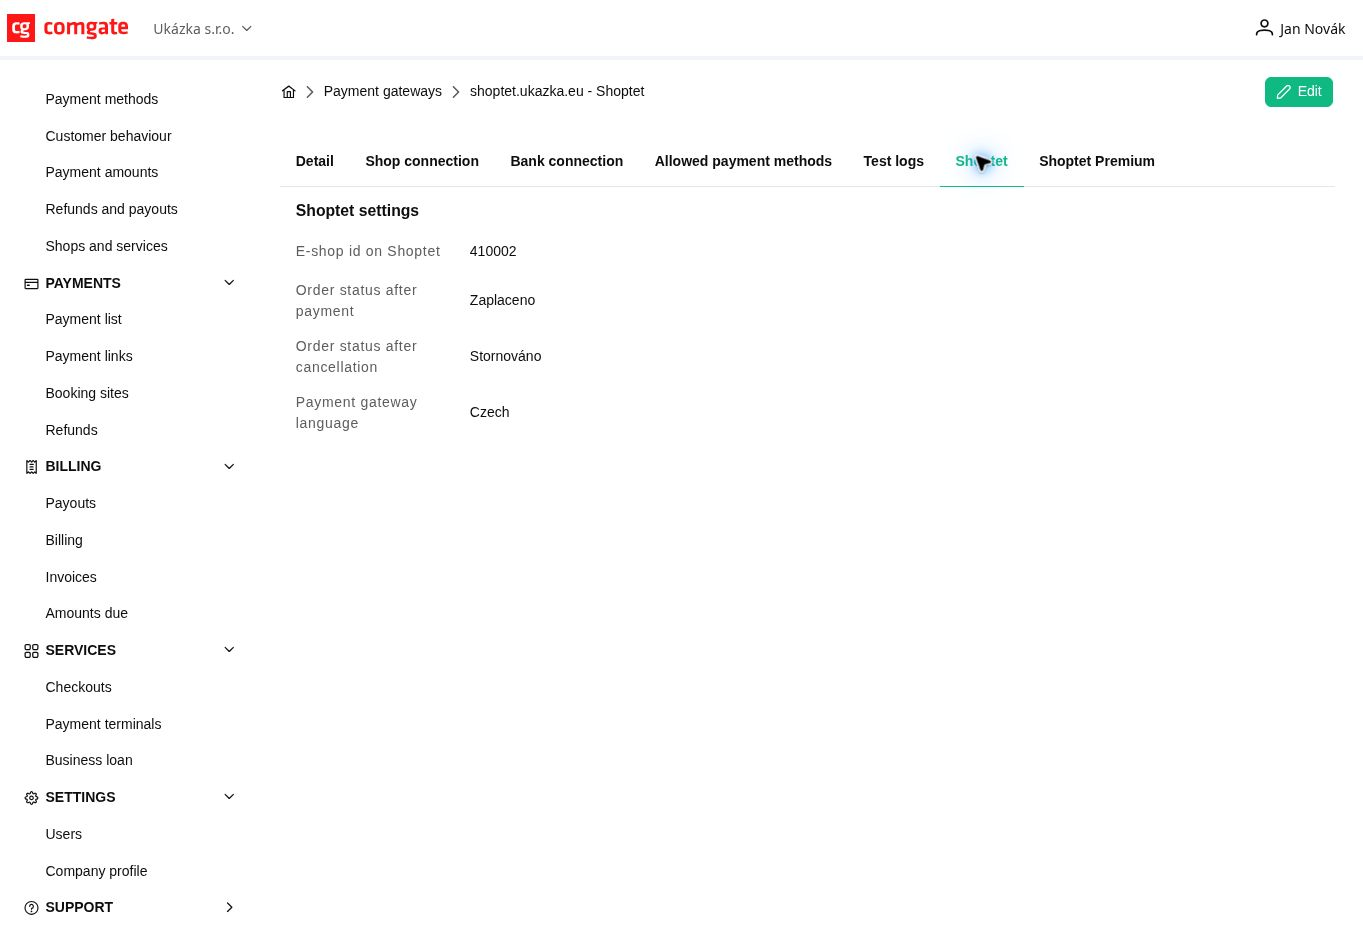
Shoptet order status settings
Test payments
When creating a test payment, set the API parameter test to true. A test payment does not actually debit the bank account.
Where to find test payments
Open Payments → Payment list.
Click Add filter → Test and select Yes.
Adjust the period and status filter as needed. To display cancelled test payments, include them in the Status filter or remove the filter.
Open the details of the selected test payment.

Displaying test payments using a filter
In the details of a test payment with Pending status, simulate the outcome using Change to Paid or Change to Cancelled. The payment result is then sent to the e-shop.

Simulating a test payment outcome
The Payment log tab shows the communication between the e-shop and Comgate for that payment. It is kept for one month. When checking your integration, verify that the log contains both a request and a response for creating the payment and for checking its status – at least four corresponding records in total. If status-check records are missing, check whether the e-shop is checking the payment status.

E-shop and Comgate communication in the payment log
Gateway test logs
To find a shop’s test logs, go to Services → Checkouts → select a shop → open the Test logs tab.
Opening test logs from the Checkouts overview
Here you can find communication records and errors encountered during testing, such as requests using a payment method, currency or IP address that is not allowed. For communication relating to a specific test payment, use its Payment log tab.

Test logs for the selected gateway
Payment terminals
Open Services → Payment terminals. Terminals are grouped by establishment.
For each terminal, you will find:
TID
the serial number
PINpad status
tip settings
the last payment
the device type

Terminals and their settings
Establishment details and contact information
Click the establishment name to open its details.

Opening an establishment by its name
The Detail tab shows the price list, status, billing method, address and contact details.
Under Contact details, use Edit to configure:
the available contacts
the language of merchant emails
the billing language
Statements are available in Czech, Slovak and English.
Customer support can change the Payment request e-mail at your request.

Establishment contact details and languages
Bank connection
Go to Services → Payment terminals → click the establishment name → open the Bank connection tab.
In the establishment details, the Bank connection tab lists payout accounts, their currencies, SWIFT, identifiers and the default account flag.

Establishment bank account for payouts
Click an account to display its details and the payouts sent to it.

Establishment account details and recent payouts
Payment terminals
Go to Services → Payment terminals → click the establishment name → open the Payment terminals tab and select a terminal.
Alternatively, click its row in the overview beneath the establishment. The device details contain Identification and Settings sections, where you can enable terminal features.
The available buttons vary depending on the device and its configuration.

Payment terminal identification and settings
Connecting to a cash register system
You can connect terminals to supported cash register systems or POS applications.
How to connect a terminal to a cash register system
Contact customer support to enable the cash register system connection.
Go to Services → Payment terminals → click the establishment name → open the Payment terminals tab.
In Settings, check Cash register system and the name of the cash register system.
To enable or disable the cash register system, click Enable POS system/Disable POS system.
Active cash register system – the terminal must be connected to the cash register system.
Inactive cash register system – the terminal works independently in standalone mode.
You can use standalone mode, for example, when working away from the establishment or if the cash register system has a technical fault.

Cash register system setting
PINpad
For devices with a PINpad, you can enable or disable its use in the terminal details with Enable PINpad/Disable PINpad.
Active PINpad – payments are made on the PINpad.
Inactive PINpad – payments are made directly on the terminal.
If you disconnect the physical PINpad cable, first disable its use in the Client Portal. If it remains active in the portal, the terminal itself will not accept transactions.

Tips
In the Tip setting, select how tips are entered, or turn the feature off using Enable tipping/Disable tipping.
This feature is available on terminals without a cash register system or where the cash register system supports it.
Tipping setting
Allowed IP addresses
Under Allowed IP addresses, click Edit.
Enter the addresses allowed to send terminal refunds through the Merchant API and requests from the CloudPos cash register system.

Allowed IP address setting
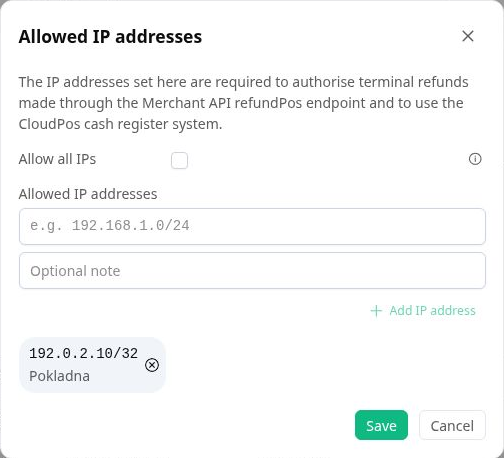
Allowed IP address settings
Receipt printing
This item shows the type of receipt printed by the terminal.
To change the setting, contact customer support.

Receipt printing setting
Shop connection
Go to Services → Payment terminals → click the establishment name → open the Shop connection tab.
Use this tab to configure API access for downloading payouts and statements. Create new access using Add connection. You can also specify allowed IP addresses for a connection.
These credentials cannot be used to create payments. The API returns payouts for the entire contract, including payment gateway payouts if the gateway is on the same contract.

Establishment API connections for payouts and statements

New API connection for payouts and statements
Business loan
Go to Services → Business loan.
The Business loan tab shows how much you could borrow and lets you apply for a loan directly.